9. CentOS 7에서 TensorFlow GPU를 설치
페이지 정보
작성자 관리자 댓글 0건 조회 3,093회 작성일 22-07-08 20:35본문
9. CentOS 7에서 TensorFlow GPU를 설치
1. 리눅스 드라이버 설치하기
참고사이트 :
Cent OS 7.x Linux Nvidia 그래픽 드라이버 설치
2. NVIDIA Driver 설치
TensorFlow 공식 홈페이지를 보면 TensorFlow GPU를 사용하기 위해 NVIDIA GPU Driver, CUDA Toolkit, cuDNN SDK가 필요하다고 안내하고 있습니다.
NVIDIA GPU Driver는 RPM 패키지를 이용해 설치하고, CUDA Toolkit과 cuDNN SDK은 NVIDIA Container Toolkit을 활용해 설치합니다.
모든 설정이 끝나면 아래 그림과 같은 아키텍처가 됩니다.
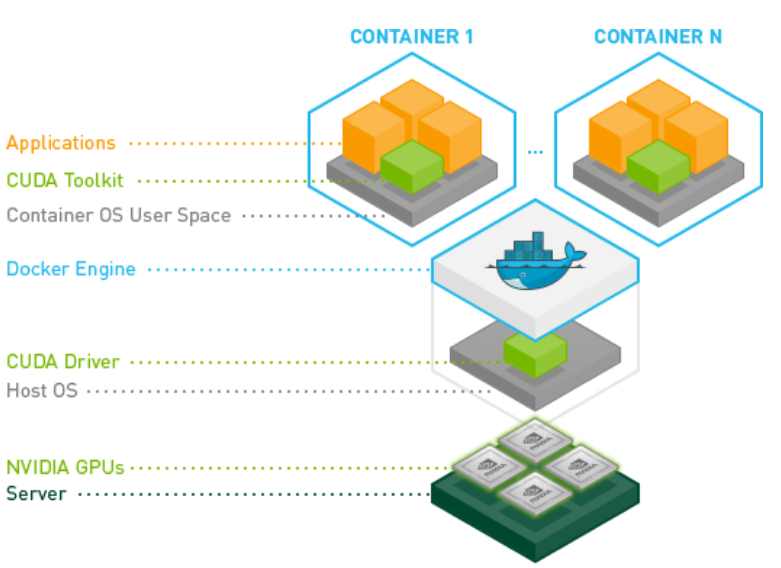
NVIDIA 공식 홈페이지에 나와 있는 설치 방법을 참고하여 진행합니다.
gcc등 의존성 Library 설치
# yum update
# yum install epel-release
# yum groups mark install 'Development Tools'
# yum install dkms yum-utils pciutils
CUDA-Capable GPU 장비 설치 확인
# lspci | grep -i nvidia
[root@localhost ~]# lspci | grep -i nvidia
02:00.0 VGA compatible controller: NVIDIA Corporation GP102 [GeForce GTX 1080 Ti] (rev a1)
02:00.1 Audio device: NVIDIA Corporation GP102 HDMI Audio Controller (rev a1)
84:00.0 VGA compatible controller: NVIDIA Corporation GP102 [GeForce GTX 1080 Ti] (rev a1)
84:00.1 Audio device: NVIDIA Corporation GP102 HDMI Audio Controller (rev a1)
[root@localhost ~]#
Kernel Headers, Development 패키지 설치
# yum install kernel-devel-$(uname -r) kernel-headers-$(uname -r)
새로 설치 된 커널적용을 위해 재부팅
# reboot
NVIDIA Driver 설치
# yum-config-manager --add-repo http://developer.download.nvidia.com/compute/cuda/repos/rhel7/x86_64/cuda-rhel7.repo
# yum clean all
# yum install nvidia-driver-latest-dkms
[root@localhost ~]# yum-config-manager --add-repo http://developer.download.nvidia.com/compute/cuda/repos/rhel7/x86_64/cuda-rhel7.repo
Loaded plugins: fastestmirror, langpacks
adding repo from: http://developer.download.nvidia.com/compute/cuda/repos/rhel7/x86_64/cuda-rhel7.repo
grabbing file http://developer.download.nvidia.com/compute/cuda/repos/rhel7/x86_64/cuda-rhel7.repo to /etc/yum.repos.d/cuda-rhel7.repo
repo saved to /etc/yum.repos.d/cuda-rhel7.repo
Driver 적용을 위해 재부팅 및 설치확인
# reboot
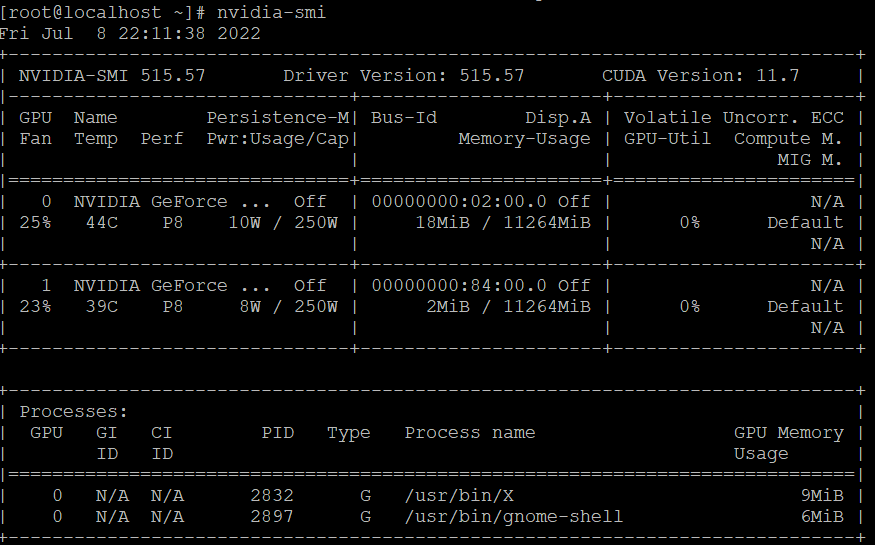
# nvidia-smi
[root@localhost ~]# nvidia-smi
Failed to initialize NVML: Driver/library version mismatch
Driver 적용을 위해 재부팅 및 설치확인
# reboot
# nvidia-smi
[root@localhost ~]# lshw -numeric -C display
*-display
description: VGA compatible controller
product: GP102 [GeForce GTX 1080 Ti] [10DE:1B06]
vendor: NVIDIA Corporation [10DE]
physical id: 0
bus info: pci@0000:02:00.0
version: a1
width: 64 bits
clock: 33MHz
capabilities: pm msi pciexpress vga_controller bus_master cap_list rom
configuration: driver=nvidia latency=0
resources: iomemory:3bf0-3bef iomemory:3bf0-3bef irq:105 memory:91000000-91ffffff memory:3bfe0000000-3bfefffffff memory:3bff0000000-3bff1ffffff ioport:2000(size=128) memory:92080000-920fffff
*-display
description: VGA compatible controller
product: G200eR2 [102B:534]
vendor: Matrox Electronics Systems Ltd. [102B]
physical id: 0
bus info: pci@0000:09:00.0
version: 01
width: 32 bits
clock: 33MHz
capabilities: pm vga_controller bus_master cap_list rom
configuration: driver=mgag200 latency=64 maxlatency=32 mingnt=16
resources: irq:17 memory:90000000-90ffffff memory:93000000-93003fff memory:92800000-92ffffff
*-display
description: VGA compatible controller
product: GP102 [GeForce GTX 1080 Ti] [10DE:1B06]
vendor: NVIDIA Corporation [10DE]
physical id: 0
bus info: pci@0000:84:00.0
version: a1
width: 64 bits
clock: 33MHz
capabilities: pm msi pciexpress vga_controller bus_master cap_list rom
configuration: driver=nvidia latency=0
resources: iomemory:3ff0-3fef iomemory:3ff0-3fef irq:106 memory:c8000000-c8ffffff memory:3ffe0000000-3ffefffffff memory:3fff0000000-3fff1ffffff ioport:8000(size=128) memory:c9080000-c90fffff
[root@localhost ~]#
3. CUDA Toolkit & cuDNN 설치
Docker CE 설치
nvidia-docker를 사용하기 위해 Docker 19.03 버전 이상을 설치합니다.
Docker 설치
# yum-config-manager --add-repo https://download.docker.com/linux/centos/docker-ce.repo
# yum install docker-ce docker-ce-cli containerd.io
Docker hello-world 이미지를 통해 설치확인
# systemctl start docker
# docker version
[root@localhost ~]# systemctl start docker
[root@localhost ~]# docker version
Client: Docker Engine - Community
Version: 20.10.17
API version: 1.41
Go version: go1.17.11
Git commit: 100c701
Built: Mon Jun 6 23:05:12 2022
OS/Arch: linux/amd64
Context: default
Experimental: true
Server: Docker Engine - Community
Engine:
Version: 20.10.17
API version: 1.41 (minimum version 1.12)
Go version: go1.17.11
Git commit: a89b842
Built: Mon Jun 6 23:03:33 2022
OS/Arch: linux/amd64
Experimental: false
containerd:
Version: 1.6.6
GitCommit: 10c12954828e7c7c9b6e0ea9b0c02b01407d3ae1
runc:
Version: 1.1.2
GitCommit: v1.1.2-0-ga916309
docker-init:
Version: 0.19.0
GitCommit: de40ad0
# docker run hello-world
[root@localhost ~]# docker run hello-world
Unable to find image 'hello-world:latest' locally
latest: Pulling from library/hello-world
2db29710123e: Pull complete
Digest: sha256:13e367d31ae85359f42d637adf6da428f76d75dc9afeb3c21faea0d976f5c651
Status: Downloaded newer image for hello-world:latest
Hello from Docker!
This message shows that your installation appears to be working correctly.
To generate this message, Docker took the following steps:
1. The Docker client contacted the Docker daemon.
2. The Docker daemon pulled the "hello-world" image from the Docker Hub.
(amd64)
3. The Docker daemon created a new container from that image which runs the
executable that produces the output you are currently reading.
4. The Docker daemon streamed that output to the Docker client, which sent it
to your terminal.
To try something more ambitious, you can run an Ubuntu container with:
$ docker run -it ubuntu bash
Share images, automate workflows, and more with a free Docker ID:
For more examples and ideas, visit:
https://docs.docker.com/get-started/
[root@localhost ~]#
NVIDIA Container Toolkit 설치
# distribution=$(. /etc/os-release;echo $ID$VERSION_ID) curl -s -L https://nvidia.github.io/nvidia-docker/$distribution/nvidia-docker.repo | sudo tee /etc/yum.repos.d/nvidia-docker.repo
# yum install nvidia-container-toolkit
[root@localhost ~]# distribution=$(. /etc/os-release;echo $ID$VERSION_ID) curl -s -L https://nvidia.github.io/nvidia-docker/$distribution/nvidia-docker.repo | sudo tee /etc/yum.repos.d/nvidia-docker.repo
[libnvidia-container]
name=libnvidia-container
baseurl=https://nvidia.github.io/libnvidia-container/stable/centos7/$basearch
repo_gpgcheck=1
gpgcheck=0
enabled=1
gpgkey=https://nvidia.github.io/libnvidia-container/gpgkey
sslverify=1
sslcacert=/etc/pki/tls/certs/ca-bundle.crt
[libnvidia-container-experimental]
name=libnvidia-container-experimental
baseurl=https://nvidia.github.io/libnvidia-container/experimental/centos7/$basearch
repo_gpgcheck=1
gpgcheck=0
enabled=0
gpgkey=https://nvidia.github.io/libnvidia-container/gpgkey
sslverify=1
sslcacert=/etc/pki/tls/certs/ca-bundle.crt
[nvidia-container-runtime]
name=nvidia-container-runtime
baseurl=https://nvidia.github.io/nvidia-container-runtime/stable/centos7/$basearch
repo_gpgcheck=1
gpgcheck=0
enabled=1
gpgkey=https://nvidia.github.io/nvidia-container-runtime/gpgkey
sslverify=1
sslcacert=/etc/pki/tls/certs/ca-bundle.crt
[nvidia-container-runtime-experimental]
name=nvidia-container-runtime-experimental
baseurl=https://nvidia.github.io/nvidia-container-runtime/experimental/centos7/$basearch
repo_gpgcheck=1
gpgcheck=0
enabled=0
gpgkey=https://nvidia.github.io/nvidia-container-runtime/gpgkey
sslverify=1
sslcacert=/etc/pki/tls/certs/ca-bundle.crt
[nvidia-docker]
name=nvidia-docker
baseurl=https://nvidia.github.io/nvidia-docker/centos7/$basearch
repo_gpgcheck=1
gpgcheck=0
enabled=1
gpgkey=https://nvidia.github.io/nvidia-docker/gpgkey
sslverify=1
sslcacert=/etc/pki/tls/certs/ca-bundle.crt
[root@localhost ~]#
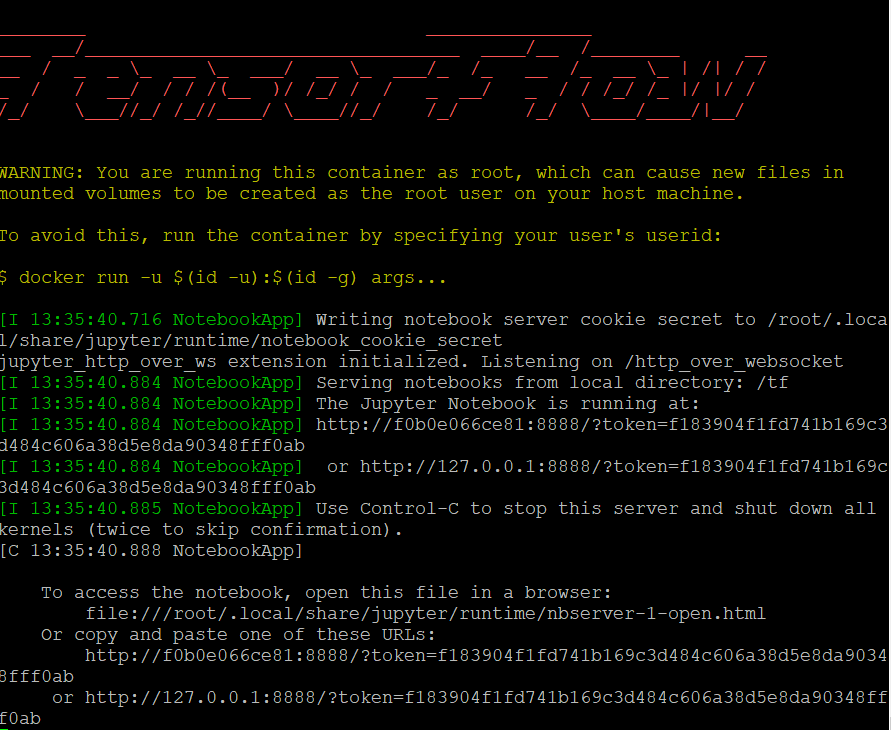
TensorFlow GPU 설치
DockerHub에 저장되어 있는 TensorFlow GPU 이미지를 로컬에 다운받아 실행합니다.
# docker pull tensorflow/tensorflow:latest-gpu-py3-jupyter
# docker run --gpus all -it --rm -p 8888:8888 tensorflow/tensorflow:latest-gpu-py3-jupyter
[root@localhost ~]# docker pull tensorflow/tensorflow:latest-gpu-py3-jupyter
latest-gpu-py3-jupyter: Pulling from tensorflow/tensorflow
7ddbc47eeb70: Pull complete
c1bbdc448b72: Pull complete
[root@localhost ~]# docker run --gpus all -it --rm -p 8888:8888 tensorflow/tensorflow:latest-gpu-py3-jupyter
웹브라우저에 127.0.0.1:8888을 입력합니다.
원격에서 접속할 때는 ;방화벽포트를 열어줘야 한다.
[root@localhost ~]# firewall-cmd --permanent --zone=public --add-port=8888/tcp
success
[root@localhost ~]# firewall-cmd --reload
success
[root@localhost ~]#
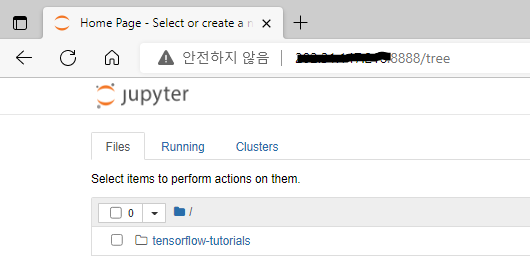
웹브라우저에 서버ip:8888을 입력합니다.
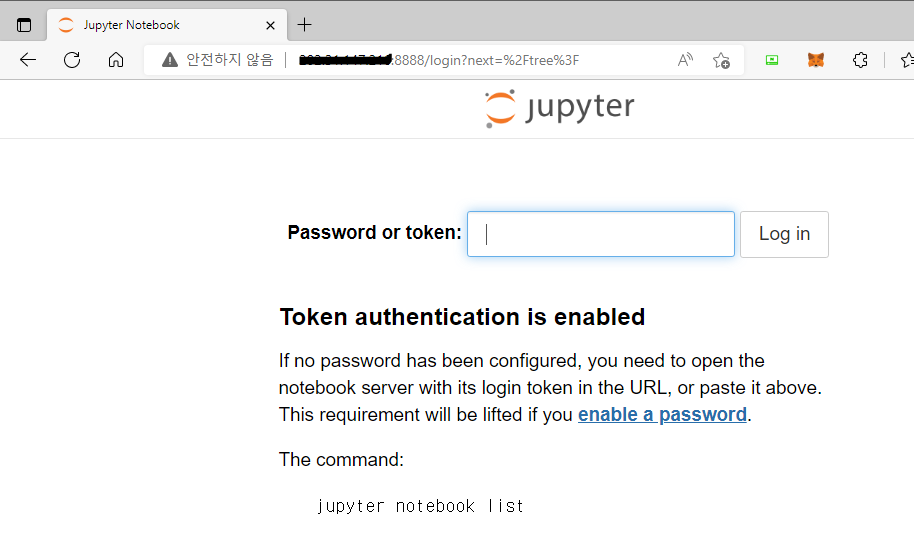
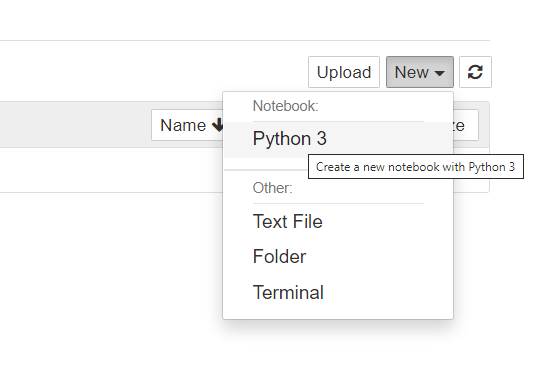
주피터 노트북이 실행되면 아래 명령어를 입력하고 Container에서 정상적으로 GPU 장치를 인식하는지 확인합니다.
from tensorflow.python.client import device_lib
device_lib.list_local_devices()
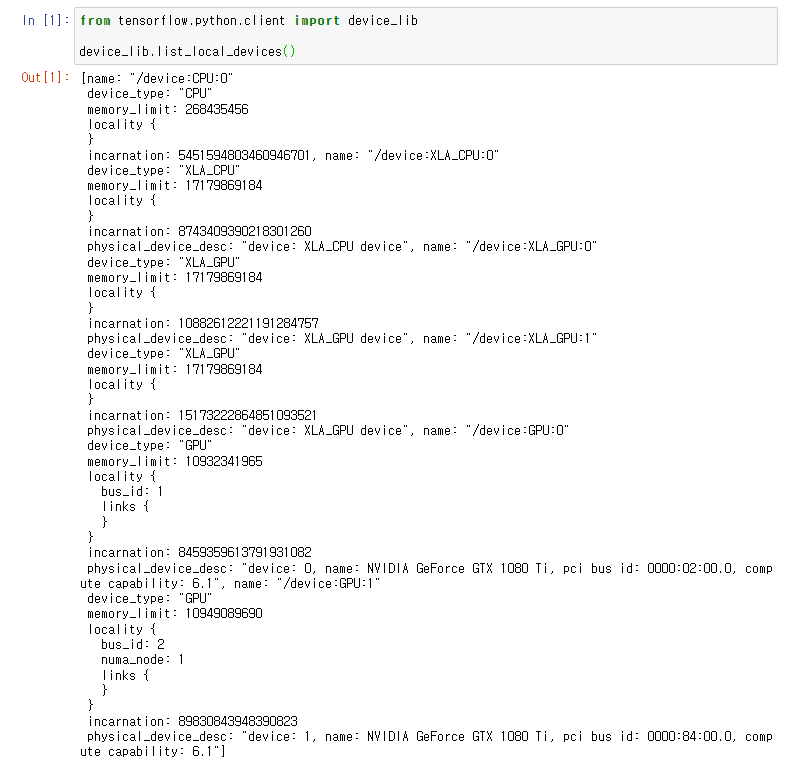
설치된 GPU 장치가 출력이 되면 모든 작업이 정성적으로 완료된 것입니다.
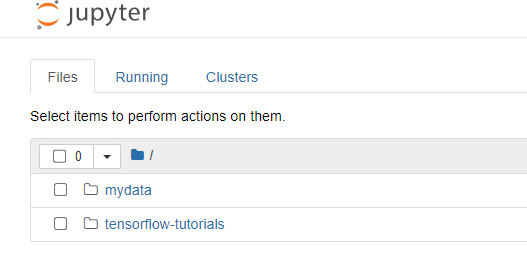
5. docker 컨테이너 데이터 공유
docker를 종료하면 내부에서 작성한 데이터도 삭제된다.
도커볼륨을 이용하여 데이터를 공유한다.
호스트PC에 폴더를 생성한다.
[root@localhost ~]# mkdir mydata
웹브라우저에서 다시 접속하면 mydata 폴더가 추가되었다.
mydata 폴더에 추가한 파일은 삭제되지 않는다.
6. Jupyter Notebook을 실행 시 비밀번호를 설정
Docker Container 내부에서 Jupyter Notebook을 실행 시 비밀번호를 설정하는 방법은 두 가지가 있다.
1) Dockerfile을 통해서 Docker Image를 만들 때, 미리 설정해주는 방법
2) Container 실행 후 Shell 명령어로 바꾸는 방법
1. Build 단계에서 설정
# Dockerfile 내용 중
RUN jupyter notebook --generate-config
RUN echo '\
from IPython.lib import passwd \n\
password = passwd("입력할 비밀번호") \n\
c.NotebookApp.password = password' >> /root/.jupyter/jupyter_notebook_config.py
2. jupyter notebook 설정에서 변경
$ jupyter notebook password
Enter password: ****
Verify password: ****
[NotebookPasswordApp] Wrote hashed password to /Users/you/.jupyter/jupyter_notebook_config.json