5. 보안서버(SSL) 설치하기
페이지 정보
작성자 관리자 댓글 0건 조회 10,590회 작성일 18-12-10 15:46본문
5. 보안서버(SSL) 설치하기
(1) SSL이란
SSL(Secure Sockets Layer)은 데이터를 암호화 하거나 통신상대를 인증함으로써 데이터를 보호합니다.
“https://”로 시작하는 URL에서 https는 “HTTP over SSL”의 약자로 http를 SSL로 암호화 한 프로토콜입니다.
SSL 통신을 사용함으로써 데이터의 ‘도청’. 데이터의 ‘변조’, 통신상대의 ‘위장’을 방지할 수 있습니다. PC와 서버간의 송수신되는 개인정보를 암호화하여, 해커가 개인정보 데이터를 갈취하더라도 복호화가 불가능하여 개인정보 자체를 보안기술입니다.
쉽게 말해 SSL은 데이터를 암호화해서 주고 받는 것이라고 생각하면 됩니다. SSL은 실제 암호문을 주고 받는 것은 양쪽이 같은 대칭키를 사용합니다. 대칭키를 전송하기 위한 공개키와는 다릅니다.
위와같이 웹서버에 SSL 인증서를 설치할 경우 이 기술이 적용된 전자문서는 별도의 암호화 과정을 거쳐 상대방에게 전달되므로 정보 송신자(웹브라우저에 정보를 입력하는 사용자)와 정보 수신자(해당 사이트의 웹서버 관리자) 외에는 그 내용을 해독할 수 없습니다. 따라서 전자문서가 전송되는 도중에 해커가 Sniffing을 시도한다고 해도 정보가 암호화되어있기 때문에 그 내용을 절대로 파악할 수 없습니다.
(2) 보안인증서 신청하기
카페24(cafe24.com)사이트에서 인증서를 신청한다.
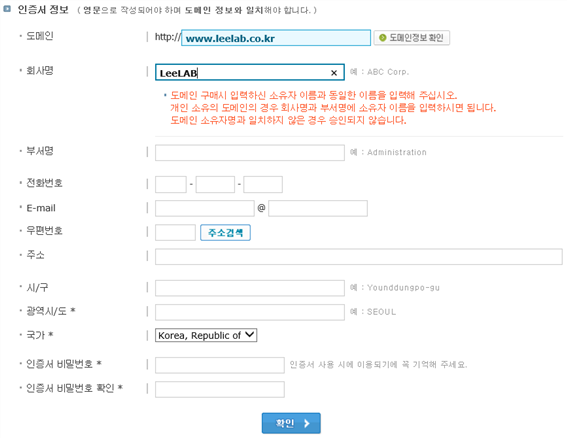
정보을 입력하고 신청하면 메일을 통해 인증키가 발급된다.
카페24의 인증서관리 메뉴에서 인증서 설치 방법을 확인할 수 있다.
도메인 소유권 확인을 위한 이메일 인증
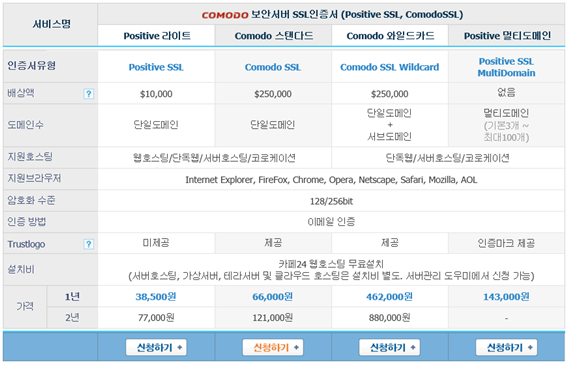
COMODO 보안서버인증서(라이트,스탠다드,와일드카드,멀티도메인) 구매시
서류가 접수되면 인증서를 신청한 도메인의 소유자 메일주소(WHOIS기준)로 소유권확인 메일이 발송됩니다.
메일은 본 메일을 받으신 후 최대 1~2일 사이에 인증서 발급기관인 COMODO社에서 직접 발송됩니다. (영문 메일)
해외에서 발송되는 메일이기 때문에, 메일이 "스팸편지함"으로 도착할 수 있습니다.
Comodo 인증 메일 수신 (Domain Control Validation)
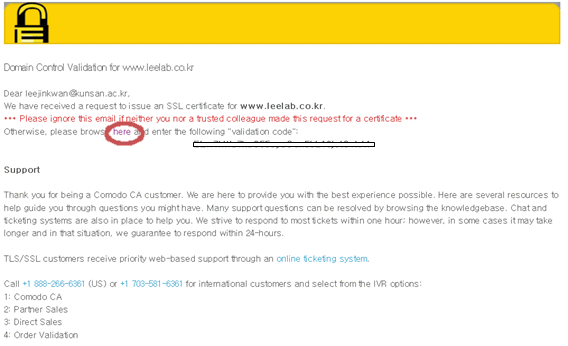
네모 안이 도메인 소유권 확인을 위한 인증키입니다.
위 인증키를 here 부분을 클릭하시어 인증키 입력 박스가 나타나면
해당 인증키를 입력 해주시면 인증 절차가 완료됩니다.
메일을 확인하고 [here]을 클릭하여 인증서 사이트에 접속한다.

키를 복사하여 붙여넣기하고 [Next]를 클릭한다.
인증확인 화면이 나오면 승인된 것이다.
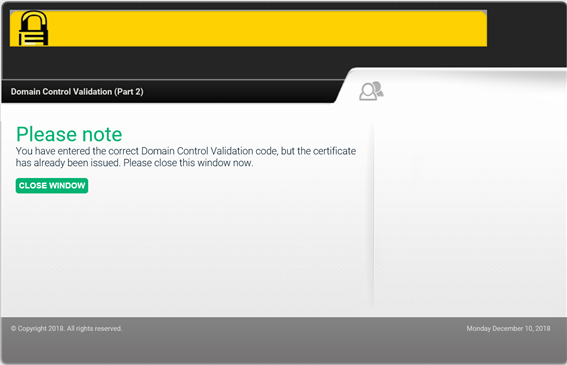
두 번 인증 요청하여 다른 메시지가 보였다.
도메인 소유자 확인을 위한 이메일 인증을 받지 않으면 인증서 발급이 거절됩니다. 서류 접수 후 인증 메일 발송까지는 최대 1~2 영업일이 소요될 수 있습니다. 인증서가 발급되면 관리자 메일주소로 인증서 설치방법 안내메일을 발송해 드립니다. 신청하신 인증서는 COMODO측에서 발급한 날짜부터 유효합니다.
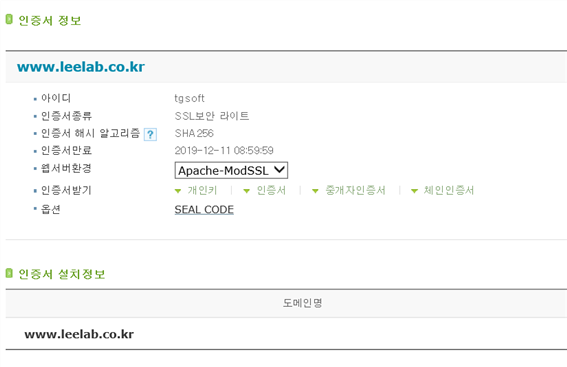
인증서를 설치할 웹서버환경을 선택한 후 '인증서' 를 클릭하면 인증서를 다운로드 할 수 있습니다.
FTP를 통해, ssl키를 서버에 업로드 한다.
/home/leelab/ssl 폴더에 업로드 하였다.
[root@localhost ssl]# ls
chain_all_ssl.crt chain_ssl.crt ssl.crt ssl.key
[root@localhost ssl]#
(3) Apache에서의 SSL 설치 및 적용
- SSL 적용 전 설치 확인
아파치 2.X 버전의 경우 mod_ssl의 기능이 포함되어있기 때문에 컴파일시 포함 시켜 설치 진행하면 사용할 수 있습니다.
[root@localhost ~]# apachectl -v
Server version: Apache/2.4.6 (CentOS)
Server built: Nov 5 2018 01:47:09
[root@localhost ~]#
아파치에서 ssl을 설치하기 위해서는 mod_ssl 모듈이 설치되어 있어야 합니다.
[root@localhost ~]# apachectl -l | grep mod
Compiled in modules:
mod_so.c
[root@localhost ~]#
동적방식(DSO)로 설치되어있습니다. 정적방식의 경우 mod_ssl.c가 설치되어있는 부분 확인이 가능합니다.
[root@localhost ~]# ll /usr/lib64/httpd/modules
합계 6940
-rwxr-xr-x 1 root root 4588224 10월 31 04:33 libphp5.so
-rwxr-xr-x 1 root root 11304 11월 5 10:48 mod_access_compat.so
-rwxr-xr-x 1 root root 11256 11월 5 10:48 mod_actions.so
-rwxr-xr-x 1 root root 15464 11월 5 10:48 mod_alias.so
-rwxr-xr-x 1 root root 11232 11월 5 10:48 mod_allowmethods.so
-rwxr-xr-x 1 root root 11184 11월 5 10:48 mod_asis.so
-rwxr-xr-x 1 root root 15416 11월 5 10:48 mod_auth_basic.so
[root@localhost ~]# ll /usr/lib64/httpd/modules |grep ssl
[root@localhost ~]#
mod_ssl.so이 없으면 설치되지 않았으므로 설치해야 합니다.
[root@localhost ~]# yum install mod_ssl -y
설치 후 다시 확인 합니다.
[root@localhost ~]# ll /usr/lib64/httpd/modules |grep ssl
-rwxr-xr-x 1 root root 219520 11월 5 10:48 mod_ssl.so
[root@localhost ~]#
openssl의 설치버전을 확인합니다.
[root@localhost ~]# rpm -qa |grep openssl
openssl-1.0.2k-16.el7.x86_64
openssl-libs-1.0.2k-16.el7.x86_64
openssl-devel-1.0.2k-16.el7.x86_64
[root@localhost ~]#
만약 openssl이 설치되어있지 않다면 yum으로 설치를 진행합니다.
[root@localhost ~]# yum -y install openssl
- httpd.conf 설정
[root@localhost ssl]# cd /etc/httpd/conf.modules.d
[root@localhost conf.modules.d]# ls
00-base.conf 00-lua.conf 00-proxy.conf 00-systemd.conf 10-php.conf
00-dav.conf 00-mpm.conf 00-ssl.conf 01-cgi.conf
00-base.conf와 00-ssl.conf 파일에 아래 모듈이 들어있다. 모두 활성화 상태이다.
LoadModule ssl_module modules/mod_ssl.so
LoadModule socache_shmcb_module modules/mod_socache_shmcb.so
#혹시 주석이 되어 있다면 mod_ssl과 mod_socache_shmcb 모듈을 활성화합니다.
[root@localhost conf.modules.d]# cd ../conf.d
[root@localhost conf.d]# ls
README owncloud-auth-none.inc userdir.conf
autoindex.conf owncloud-defaults.inc vhost.leelab.co.kr.conf
owncloud-access.conf.avail owncloud.conf welcome.conf
owncloud-auth-any.inc php.conf
owncloud-auth-local.inc ssl.conf
[root@localhost conf.d]#
소스로 설치했다면 아래 파일이 ssl관련 설정 파일이다.
# cd /usr/local/httpd/conf
# vi httpd.conf
LoadModule ssl_module modules/mod_ssl.so
LoadModule socache_shmcb_module modules/mod_socache_shmcb.so
# mod_ssl과 mod_socache_shmcb 모듈을 활성화합니다.
Include conf/extra/httpd-ssl.conf
# httpd-ssl.conf를 사용할 수 있도록 활성화 시킵니다.
- ssl.conf 설정
[root@localhost conf.d]# vi ssl.conf
#
# When we also provide SSL we have to listen to the
# the HTTPS port in addition.
#
Listen 443 https
##
## SSL Global Context
##
## All SSL configuration in this context applies both to
## the main server and all SSL-enabled virtual hosts.
##
# Pass Phrase Dialog:
# Configure the pass phrase gathering process.
# The filtering dialog program (`builtin' is a internal
# terminal dialog) has to provide the pass phrase on stdout.
SSLPassPhraseDialog exec:/usr/libexec/httpd-ssl-pass-dialog
# Inter-Process Session Cache:
# Configure the SSL Session Cache: First the mechanism
# to use and second the expiring timeout (in seconds).
SSLSessionCache shmcb:/run/httpd/sslcache(512000)
SSLSessionCacheTimeout 300
# Pseudo Random Number Generator (PRNG):
# Configure one or more sources to seed the PRNG of the
# SSL library. The seed data should be of good random quality.
# WARNING! On some platforms /dev/random blocks if not enough entropy
# is available. This means you then cannot use the /dev/random device
# because it would lead to very long connection times (as long as
# it requires to make more entropy available). But usually those
# platforms additionally provide a /dev/urandom device which doesn't
# block. So, if available, use this one instead. Read the mod_ssl User
# Manual for more details.
SSLRandomSeed startup file:/dev/urandom 256
SSLRandomSeed connect builtin
#SSLRandomSeed startup file:/dev/random 512
#SSLRandomSeed connect file:/dev/random 512
#SSLRandomSeed connect file:/dev/urandom 512
#
# Use "SSLCryptoDevice" to enable any supported hardware
# accelerators. Use "openssl engine -v" to list supported
# engine names. NOTE: If you enable an accelerator and the
# server does not start, consult the error logs and ensure
# your accelerator is functioning properly.
#
SSLCryptoDevice builtin
#SSLCryptoDevice ubsec
##
## SSL Virtual Host Context
##
<VirtualHost _default_:443>
# General setup for the virtual host, inherited from global configuration
#DocumentRoot "/var/www/html"
#ServerName www.example.com:443
# Use separate log files for the SSL virtual host; note that LogLevel
# is not inherited from httpd.conf.
ErrorLog logs/ssl_error_log
TransferLog logs/ssl_access_log
LogLevel warn
# SSL Engine Switch:
# Enable/Disable SSL for this virtual host.
SSLEngine on
# SSL Protocol support:
# List the enable protocol levels with which clients will be able to
# connect. Disable SSLv2 access by default:
SSLProtocol all -SSLv2 -SSLv3
# SSL Cipher Suite:
# List the ciphers that the client is permitted to negotiate.
# See the mod_ssl documentation for a complete list.
SSLCipherSuite HIGH:3DES:!aNULL:!MD5:!SEED:!IDEA
# Speed-optimized SSL Cipher configuration:
# If speed is your main concern (on busy HTTPS servers e.g.),
# you might want to force clients to specific, performance
# optimized ciphers. In this case, prepend those ciphers
# to the SSLCipherSuite list, and enable SSLHonorCipherOrder.
# Caveat: by giving precedence to RC4-SHA and AES128-SHA
# (as in the example below), most connections will no longer
# have perfect forward secrecy - if the server's key is
# compromised, captures of past or future traffic must be
# considered compromised, too.
#SSLCipherSuite RC4-SHA:AES128-SHA:HIGH:MEDIUM:!aNULL:!MD5
#SSLHonorCipherOrder on
# Server Certificate:
# Point SSLCertificateFile at a PEM encoded certificate. If
# the certificate is encrypted, then you will be prompted for a
# pass phrase. Note that a kill -HUP will prompt again. A new
# certificate can be generated using the genkey(1) command.
SSLCertificateFile /etc/pki/tls/certs/localhost.crt
# Server Private Key:
# If the key is not combined with the certificate, use this
# directive to point at the key file. Keep in mind that if
# you've both a RSA and a DSA private key you can configure
# both in parallel (to also allow the use of DSA ciphers, etc.)
SSLCertificateKeyFile /etc/pki/tls/private/localhost.key
# Server Certificate Chain:
# Point SSLCertificateChainFile at a file containing the
# concatenation of PEM encoded CA certificates which form the
# certificate chain for the server certificate. Alternatively
# the referenced file can be the same as SSLCertificateFile
# when the CA certificates are directly appended to the server
# certificate for convinience.
#SSLCertificateChainFile /etc/pki/tls/certs/server-chain.crt
# Certificate Authority (CA):
# Set the CA certificate verification path where to find CA
# certificates for client authentication or alternatively one
# huge file containing all of them (file must be PEM encoded)
#SSLCACertificateFile /etc/pki/tls/certs/ca-bundle.crt
# Client Authentication (Type):
# Client certificate verification type and depth. Types are
# none, optional, require and optional_no_ca. Depth is a
# number which specifies how deeply to verify the certificate
# issuer chain before deciding the certificate is not valid.
#SSLVerifyClient require
#SSLVerifyDepth 10
# Access Control:
# With SSLRequire you can do per-directory access control based
# on arbitrary complex boolean expressions containing server
# variable checks and other lookup directives. The syntax is a
# mixture between C and Perl. See the mod_ssl documentation
# for more details.
#<Location />
#SSLRequire ( %{SSL_CIPHER} !~ m/^(EXP|NULL)/ \
# and %{SSL_CLIENT_S_DN_O} eq "Snake Oil, Ltd." \
# and %{SSL_CLIENT_S_DN_OU} in {"Staff", "CA", "Dev"} \
# and %{TIME_WDAY} >= 1 and %{TIME_WDAY} <= 5 \
# and %{TIME_HOUR} >= 8 and %{TIME_HOUR} <= 20 ) \
# or %{REMOTE_ADDR} =~ m/^192\.76\.162\.[0-9]+$/
#</Location>
# SSL Engine Options:
# Set various options for the SSL engine.
# o FakeBasicAuth:
# Translate the client X.509 into a Basic Authorisation. This means that
# the standard Auth/DBMAuth methods can be used for access control. The
# user name is the `one line' version of the client's X.509 certificate.
# Note that no password is obtained from the user. Every entry in the user
# file needs this password: `xxj31ZMTZzkVA'.
# o ExportCertData:
# This exports two additional environment variables: SSL_CLIENT_CERT and
# SSL_SERVER_CERT. These contain the PEM-encoded certificates of the
# server (always existing) and the client (only existing when client
# authentication is used). This can be used to import the certificates
# into CGI scripts.
# o StdEnvVars:
# This exports the standard SSL/TLS related `SSL_*' environment variables.
# Per default this exportation is switched off for performance reasons,
# because the extraction step is an expensive operation and is usually
# useless for serving static content. So one usually enables the
# exportation for CGI and SSI requests only.
# o StrictRequire:
# This denies access when "SSLRequireSSL" or "SSLRequire" applied even
# under a "Satisfy any" situation, i.e. when it applies access is denied
# and no other module can change it.
# o OptRenegotiate:
# This enables optimized SSL connection renegotiation handling when SSL
# directives are used in per-directory context.
#SSLOptions +FakeBasicAuth +ExportCertData +StrictRequire
<Files ~ "\.(cgi|shtml|phtml|php3?)$">
SSLOptions +StdEnvVars
</Files>
<Directory "/var/www/cgi-bin">
SSLOptions +StdEnvVars
</Directory>
# SSL Protocol Adjustments:
# The safe and default but still SSL/TLS standard compliant shutdown
# approach is that mod_ssl sends the close notify alert but doesn't wait for
# the close notify alert from client. When you need a different shutdown
# approach you can use one of the following variables:
# o ssl-unclean-shutdown:
# This forces an unclean shutdown when the connection is closed, i.e. no
# SSL close notify alert is send or allowed to received. This violates
# the SSL/TLS standard but is needed for some brain-dead browsers. Use
# this when you receive I/O errors because of the standard approach where
# mod_ssl sends the close notify alert.
# o ssl-accurate-shutdown:
# This forces an accurate shutdown when the connection is closed, i.e. a
# SSL close notify alert is send and mod_ssl waits for the close notify
# alert of the client. This is 100% SSL/TLS standard compliant, but in
# practice often causes hanging connections with brain-dead browsers. Use
# this only for browsers where you know that their SSL implementation
# works correctly.
# Notice: Most problems of broken clients are also related to the HTTP
# keep-alive facility, so you usually additionally want to disable
# keep-alive for those clients, too. Use variable "nokeepalive" for this.
# Similarly, one has to force some clients to use HTTP/1.0 to workaround
# their broken HTTP/1.1 implementation. Use variables "downgrade-1.0" and
# "force-response-1.0" for this.
BrowserMatch "MSIE [2-5]" \
nokeepalive ssl-unclean-shutdown \
downgrade-1.0 force-response-1.0
# Per-Server Logging:
# The home of a custom SSL log file. Use this when you want a
# compact non-error SSL logfile on a virtual host basis.
CustomLog logs/ssl_request_log \
"%t %h %{SSL_PROTOCOL}x %{SSL_CIPHER}x \"%r\" %b"
</VirtualHost>
<VirtualHost *:443>
DocumentRoot “/home/leelab/www/” # 홈소스 위치
ServerName www.leelab.co.kr
ServerAdmin admin@leelab.co.kr
ErrorLog “/var/log/httpd/leelab.co.kr_error_log”
TransferLog “/var/log/httpd/leelab.co.kr_access_log”
SSLEngine on
SSLCertificateKeyFile "/home/leelab/ssl/ssl.key"
SSLCertificateFile "/home/leelab/ssl/ssl.crt"
SSLCertificateChainFile "/home/leelab/ssl/chain_all_ssl.crt"
</VirtualHost>
[root@localhost conf.d]#
아파치서버를 재시작한다.
[root@localhost conf.d]# systemctl restart httpd
Enter SSL pass phrase for www.leelab.co.kr:443 (RSA) : **********
[root@localhost conf.d]#
비밀번호를 입력하라고 나오는데, 인증서 신청시 등록했던 비밀번호를 입력하면 성공한다.
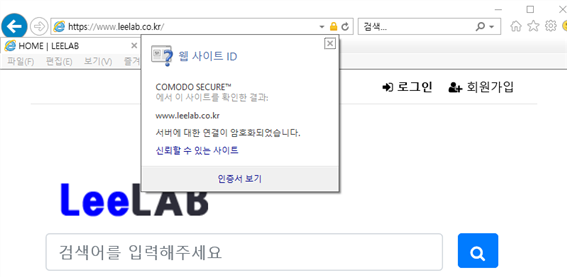
주소창에 https://www.leelab.co.kr 주소를 입력하여 확인한다.
아파치를 재시작할 때 마다 비밀번호 치는게 귀찮을 수 있다. 비밀번호를 물어보지 않고 바로 실행하도록 한다.
[root@localhost conf.d]# cd /home/leelab/ssl
[root@localhost ssl]# ls
chain_all_ssl.crt chain_ssl.crt ssl.crt ssl.key
[root@localhost ssl]# openssl rsa -in ssl.key -out ssl_new.key
Enter pass phrase for ssl.key:
writing RSA key
[root@localhost ssl]#
[root@localhost ssl]# cd /etc/httpd/conf.d
[root@localhost conf.d]# vi ssl.conf
SSLCertificateKeyFile "/home/leelab/ssl/ssl_new.key“
[root@localhost conf.d]#
새로운 키로 수정한다.
[root@localhost conf.d]# systemctl restart httpd
[root@localhost conf.d]#
재시작하면 비밀번호를 묻지않고 재시작된다.
- 방화벽 설정
SSL의 경우 기본적으로 443포트를 사용중이기 때문에 방화벽에 443 포트 설정 후 방화벽을 재시작합니다.
https로 접속할 수 있도록 포트를 열어줍니다.
# firewall-cmd --permanent --add-service=https
success
방화벽을 다시 로드합니다.
# firewall-cmd --reload
success
아파치 데몬 재시작 후 정상적으로 데몬이 올라와있는지 확인합니다. 데몬 재시작 전 syntax 구문 에러 검사 후 진행해야 합니다.
사이트에 접속한다.