3. OpenCV 설치 (2)
페이지 정보
작성자 관리자 댓글 2건 조회 10,619회 작성일 20-03-14 21:36본문
3. OpenCV 설치 (2)
참고.
https://webnautes.tistory.com/1268
https://brunch.co.kr/@mystoryg/76
https://rootiel.tistory.com/24
https://webnautes.tistory.com/1054
1. 프로젝트 수정
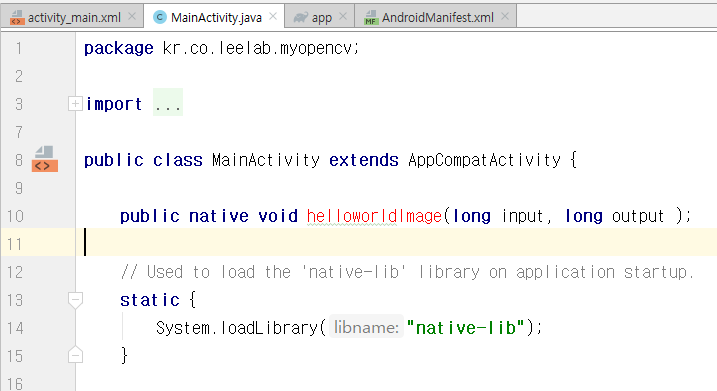
MainActivity.java에서 사용할 함수를 추가한다.
public native void helloworldImage(long input, long output );
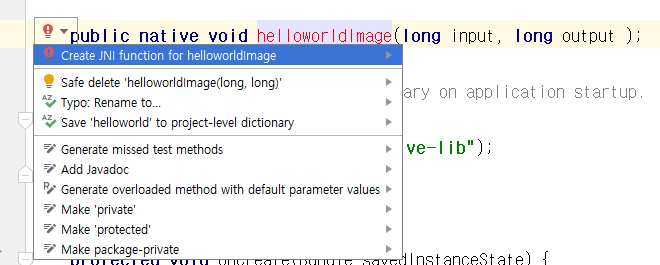
Native-lib.cpp 에서 실제 실행되는 함수를 추가한다. 아래와 같이 자동으로 추가할 수도 있다.
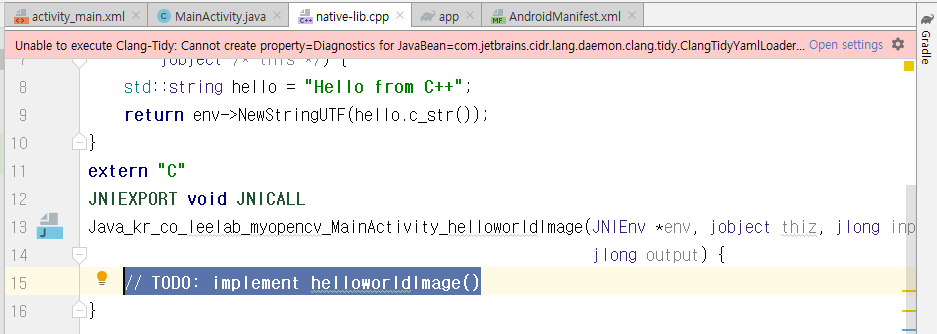
Native-lib.cpp에 함수를 추가한다.
extern "C"
JNIEXPORT void JNICALL
Java_kr_co_leelab_myopencv_MainActivity_helloworldImage(JNIEnv *env, jobject thiz, jlong input,
jlong output) {
// TODO: implement helloworldImage()
}
// TODO 부분에 실제 내용을 적어준다.
여기는 OpenCV CPP 사용하는 것처럼 사용하면 된다.
파일명 : Native-lib.cpp
#include <jni.h>
#include <string>
#include <opencv2/opencv.hpp>

using namespace cv;

//extern "C" JNIEXPORT jstring JNICALL
//Java_kr_co_leelab_myopencv_MainActivity_stringFromJNI(
//        JNIEnv *env,
//        jobject /* this */) {
//    std::string hello = "Hello from C++";
//    return env->NewStringUTF(hello.c_str());
//}
extern "C"
JNIEXPORT void JNICALL
Java_kr_co_leelab_myopencv_MainActivity_helloworldImage(JNIEnv *env, jobject thiz, jlong input,
                                                        jlong output) {
    // TODO: implement helloworldImage()

    Mat &inMat = *(Mat *)input;
    Mat &resultMat = *(Mat *)output;

    cvtColor(inMat, resultMat, COLOR_RGB2GRAY);
    putText(resultMat,"HelloAndroidOpenCV",Point(40,100), 2, 2, Scalar(255,0,0));
}
CMakeLists.txt를 수정한다.
# For more information about using CMake with Android Studio, read the
# documentation: https://d.android.com/studio/projects/add-native-code.html

# Sets the minimum version of CMake required to build the native library.

cmake_minimum_required(VERSION 3.4.1)

set(pathPROJECT D:/Android6/MyOpenCV)
set(pathOPENCV ${pathPROJECT}/opencv)
set(pathLIBOPENCV_JAVA ${pathOPENCV}/native/libs/${ANDROID_ABI}/libopencv_java4.so)

set(CMAKE_VERBOSE_MAKEFILE on)
set(CMAKE_CXX_FLAGS "${CMAKE_CXX_FLAGS} -std=gnu++11")

include_directories(${pathOPENCV}/native/jni/include)

# Creates and names a library, sets it as either STATIC
# or SHARED, and provides the relative paths to its source code.
# You can define multiple libraries, and CMake builds them for you.
# Gradle automatically packages shared libraries with your APK.

add_library( # Sets the name of the library.
        native-lib

        # Sets the library as a shared library.
        SHARED

        # Provides a relative path to your source file(s).
        native-lib.cpp)

add_library(lib_opencv SHARED  IMPORTED)
set_target_properties(lib_opencv PROPERTIES IMPORTED_LOCATION ${pathLIBOPENCV_JAVA})

# Searches for a specified prebuilt library and stores the path as a
# variable. Because CMake includes system libraries in the search path by
# default, you only need to specify the name of the public NDK library
# you want to add. CMake verifies that the library exists before
# completing its build.

find_library( # Sets the name of the path variable.
        log-lib

        # Specifies the name of the NDK library that
        # you want CMake to locate.
        log)

# Specifies libraries CMake should link to your target library. You
# can link multiple libraries, such as libraries you define in this
# build script, prebuilt third-party libraries, or system libraries.

target_link_libraries( # Specifies the target library.
        native-lib
        lib_opencv
        # Links the target library to the log library
        # included in the NDK.
        ${log-lib})
레이아웃 파일 activity_main.xml 을 다음 코드로 대체합니다.
파일명 : activity_main.xml
<?xml version="1.0" encoding="utf-8"?>
<LinearLayout xmlns:android="http://schemas.android.com/apk/res/android"
    xmlns:tools="http://schemas.android.com/tools"
    android:layout_width="match_parent"
    android:layout_height="match_parent"
    tools:context=".MainActivity" >

    <org.opencv.android.JavaCameraView
        android:layout_width="match_parent"
        android:layout_height="match_parent"
        android:id="@+id/activity_surface_view" />

</LinearLayout>
JNI(Java Native Interface)를 사용하여 C/C++ 함수를 호출하는 JAVA 코드를 작성합니다.
파일명 : MainActivity.java
package kr.co.leelab.myopencv;
import androidx.appcompat.app.AppCompatActivity;
import android.annotation.TargetApi;
import android.app.AlertDialog;
import android.content.DialogInterface;
import android.content.pm.PackageManager;
import android.os.Build;
import android.os.Bundle;
import android.util.Log;
import android.view.SurfaceView;
import android.view.WindowManager;

import org.opencv.android.BaseLoaderCallback;
import org.opencv.android.CameraBridgeViewBase;
import org.opencv.android.LoaderCallbackInterface;
import org.opencv.android.OpenCVLoader;
import org.opencv.core.Mat;

import java.util.Collections;
import java.util.List;

import static android.Manifest.permission.CAMERA;

public class MainActivity extends AppCompatActivity implements CameraBridgeViewBase.CvCameraViewListener2{
    private static final String TAG = "LEELAB_DEBUG";
    private Mat matInput;
    private Mat matResult;
    private CameraBridgeViewBase mOpenCvCameraView;

    public native void helloworldImage(long input, long output );

    // Used to load the 'native-lib' library on application startup.
    static {
        System.loadLibrary("opencv_java4");
        System.loadLibrary("native-lib");
    }

    @Override
    protected void onCreate(Bundle savedInstanceState) {
        super.onCreate(savedInstanceState);

        getWindow().setFlags(WindowManager.LayoutParams.FLAG_FULLSCREEN,
                WindowManager.LayoutParams.FLAG_FULLSCREEN);
        getWindow().setFlags(WindowManager.LayoutParams.FLAG_KEEP_SCREEN_ON,
                WindowManager.LayoutParams.FLAG_KEEP_SCREEN_ON);

        setContentView(R.layout.activity_main);

        mOpenCvCameraView = (CameraBridgeViewBase)findViewById(R.id.activity_surface_view);
        mOpenCvCameraView.setVisibility(SurfaceView.VISIBLE);
        mOpenCvCameraView.setCvCameraViewListener(this);
        mOpenCvCameraView.setCameraIndex(0); // front-camera(1),  back-camera(0)
        mLoaderCallback.onManagerConnected(LoaderCallbackInterface.SUCCESS);
    }
    @Override
    public void onPause()
    {
        super.onPause();
        if (mOpenCvCameraView != null)
            mOpenCvCameraView.disableView();
    }

    @Override
    public void onResume()
    {
        super.onResume();

        if (!OpenCVLoader.initDebug()) {
            Log.d(TAG, "onResume :: Internal OpenCV library not found.");
            OpenCVLoader.initAsync(OpenCVLoader.OPENCV_VERSION_3_2_0, this, mLoaderCallback);
        } else {
            Log.d(TAG, "onResum :: OpenCV library found inside package. Using it!");
            mLoaderCallback.onManagerConnected(LoaderCallbackInterface.SUCCESS);
        }
    }

    public void onDestroy() {
        super.onDestroy();

        if (mOpenCvCameraView != null)
            mOpenCvCameraView.disableView();
    }

    @Override
    public void onCameraViewStarted(int width, int height) {

    }

    @Override
    public void onCameraViewStopped() {

    }

    @Override
    public Mat onCameraFrame(CameraBridgeViewBase.CvCameraViewFrame inputFrame) {

        matInput = inputFrame.rgba();

        if ( matResult == null )
            matResult = new Mat(matInput.rows(), matInput.cols(), matInput.type());
        helloworldImage(matInput.getNativeObjAddr(), matResult.getNativeObjAddr());
        return matResult;
    }

    private BaseLoaderCallback mLoaderCallback = new BaseLoaderCallback(this) {
        @Override
        public void onManagerConnected(int status) {
            switch (status) {
                case LoaderCallbackInterface.SUCCESS:
                {
                    mOpenCvCameraView.enableView();
                } break;
                default:
                {
                    super.onManagerConnected(status);
                } break;
            }
        }
    };
    protected List<? extends CameraBridgeViewBase> getCameraViewList() {
        return Collections.singletonList(mOpenCvCameraView);
    }
    //여기서부턴 퍼미션 관련 메소드
    private static final int CAMERA_PERMISSION_REQUEST_CODE = 200;

    protected void onCameraPermissionGranted() {
        List<? extends CameraBridgeViewBase> cameraViews = getCameraViewList();
        if (cameraViews == null) {
            return;
        }
        for (CameraBridgeViewBase cameraBridgeViewBase: cameraViews) {
            if (cameraBridgeViewBase != null) {
                cameraBridgeViewBase.setCameraPermissionGranted();
            }
        }
    }

    @Override
    protected void onStart() {
        super.onStart();
        boolean havePermission = true;
        if (Build.VERSION.SDK_INT >= Build.VERSION_CODES.M) {
            if (checkSelfPermission(CAMERA) != PackageManager.PERMISSION_GRANTED) {
                requestPermissions(new String[]{CAMERA}, CAMERA_PERMISSION_REQUEST_CODE);
                havePermission = false;
            }
        }
        if (havePermission) {
            onCameraPermissionGranted();
        }
    }

    @Override
    @TargetApi(Build.VERSION_CODES.M)
    public void onRequestPermissionsResult(int requestCode, String[] permissions, int[] grantResults) {
        if (requestCode == CAMERA_PERMISSION_REQUEST_CODE && grantResults.length > 0
                && grantResults[0] == PackageManager.PERMISSION_GRANTED) {
            onCameraPermissionGranted();
        }else{
            showDialogForPermission("앱을 실행하려면 퍼미션을 허가하셔야합니다.");
        }
        super.onRequestPermissionsResult(requestCode, permissions, grantResults);
    }

    @TargetApi(Build.VERSION_CODES.M)
    private void showDialogForPermission(String msg) {

        AlertDialog.Builder builder = new AlertDialog.Builder( MainActivity.this);
        builder.setTitle("알림");
        builder.setMessage(msg);
        builder.setCancelable(false);
        builder.setPositiveButton("예", new DialogInterface.OnClickListener() {
            public void onClick(DialogInterface dialog, int id){
                requestPermissions(new String[]{CAMERA}, CAMERA_PERMISSION_REQUEST_CODE);
            }
        });
        builder.setNegativeButton("아니오", new DialogInterface.OnClickListener() {
            public void onClick(DialogInterface arg0, int arg1) {
                finish();
            }
        });
        builder.create().show();
    }

}