| RedHat Linux >> Server Administration for Redhat Linux
|
| [목차] |
|
제5장 Apache Web 서버
9. Apache + mod_SSL + PHP + MySQL 소스로 설치하기
1. MOD_SSL을 아파치에 포팅하기 가. 기존 아파치 지우기 [root@w3 down]# rpm -qa | grep apache apache-manual-1.3.14-3kr apache-devel-1.3.14-3kr apache-1.3.14-3kr [root@w3 down]# rpm -e apache-manual cannot remove /var/www/html/manual/mod - directory not empty cannot remove /var/www/html/manual - directory not empty [root@w3 down]# rpm -e apache-devel [root@w3 down]# rpm -e apache error: removing these packages would break dependencies: apache = 1.3.14-3kr is needed by mod_ssl-2.7.1-3kr webserver is needed by mod_dav-1.0.1-2 webserver is needed by mod_perl-1.24-4 webserver is needed by mod_php-4.0.3pl1-1 webserver is needed by nut-cgi-0.44.0-4 [root@w3 down]# rpm -e mod_ssl cannot remove /etc/httpd/conf/ssl.key - directory not empty cannot remove /etc/httpd/conf/ssl.crt - directory not empty [root@w3 down]# rpm -e mod_dv error: package mod_dv is not installed [root@w3 down]# rpm -e mod_dav [root@w3 down]# rpm -e mod_perl [root@w3 down]# rpm -e mod_php error: removing these packages would break dependencies: mod_php = 4.0.3pl1-1 is needed by php-manual-4.0.3pl1-1 [root@w3 down]# rpm -e php-manual [root@w3 down]# rpm -e mod_php [root@w3 down]# rpm -e nut-cgi [root@w3 down]# rpm -e apache cannot remove /var/www/html - directory not empty cannot remove /var/www/cgi-bin - directory not empty cannot remove /var/www - directory not empty cannot remove /var/log/httpd - directory not empty cannot remove /usr/lib/apache - directory not empty cannot remove /etc/httpd/conf - directory not empty [root@w3 down]#
나. mod_ssl 설치하기 [root@w3 mod_ssl-2.8.5-1.3.22]# ./configure --with-apache=../apache_1.3.22 Configuring mod_ssl/2.8.5 for Apache/1.3.22 + Apache location: ../apache_1.3.22 (Version 1.3.22) + Auxiliary patch tool: ./etc/patch/patch (local) + Applying packages to Apache source tree: o Extended API (EAPI) o Distribution Documents o SSL Module Source o SSL Support o SSL Configuration Additions o SSL Module Documentation o Addons Done: source extension and patches successfully applied.
Now proceed with the following commands (Bourne-Shell syntax): $ cd ../apache_1.3.22 $ SSL_BASE=/path/to/openssl ./configure ... --enable-module=ssl $ make $ make certificate $ make install
다. 아파치 설치하기 [root@w3 mod_ssl-2.8.5-1.3.22]# cd ../apache_1.3.22 [root@w3 apache_1.3.22]# ./configure --prefix=/usr/local/httpd --enable-shared=max --enable-module=all --disable-module=auth_db --enable-module=ssl [root@w3 apache_1.3.22]# make
생략... +---------------------------------------------------------------------+ | Before you install the package you now should prepare the SSL | | certificate system by running the 'make certificate' command. | | For different situations the following variants are provided: | | | | % make certificate TYPE=dummy (dummy self-signed Snake Oil cert) | | % make certificate TYPE=test (test cert signed by Snake Oil CA) | | % make certificate TYPE=custom (custom cert signed by own CA) | | % make certificate TYPE=existing (existing cert) | | CRT=/path/to/your.crt [KEY=/path/to/your.key] | | | | Use TYPE=dummy when you're a vendor package maintainer, | | the TYPE=test when you're an admin but want to do tests only, | | the TYPE=custom when you're an admin willing to run a real server | | and TYPE=existing when you're an admin who upgrades a server. | | (The default is TYPE=test) | | | | Additionally add ALGO=RSA (default) or ALGO=DSA to select | | the signature algorithm used for the generated certificate. | | | | Use 'make certificate VIEW=1' to display the generated data. | | | | Thanks for using Apache & mod_ssl. Ralf S. Engelschall | | rse@engelschall.com | | www.engelschall.com | +---------------------------------------------------------------------+ make[1]: Leaving directory `/usr/local/src/apache_1.3.22' <=== src [root@ns apache_1.3.22]# [root@w3 apache_1.3.22]# make certificate make[1]: 들어감 `/home/jklee/down/apache_1.3.22/src' 디렉토리 SSL Certificate Generation Utility (mkcert.sh) Copyright (c) 1998-2000 Ralf S. Engelschall, All Rights Reserved.
Generating test certificate signed by Snake Oil CA [TEST] WARNING: Do not use this for real-life/production systems ______________________________________________________________________
STEP 0: Decide the signature algorithm used for certificate The generated X.509 CA certificate can contain either RSA or DSA based ingredients. Select the one you want to use. Signature Algorithm ((R)SA or (D)SA) [R]:엔터 ______________________________________________________________________
STEP 1: Generating RSA private key (1024 bit) [server.key] 81375 semi-random bytes loaded Generating RSA private key, 1024 bit long modulus .............................................................++++++ ...............++++++ e is 65537 (0x10001) ______________________________________________________________________
STEP 2: Generating X.509 certificate signing request [server.csr] Using configuration from .mkcert.cfg You are about to be asked to enter information that will be incorporated into your certificate request. What you are about to enter is what is called a Distinguished Name or a DN. There are quite a few fields but you can leave some blank For some fields there will be a default value, If you enter '.', the field will be left blank. ----- 1. Country Name (2 letter code) [XY]:엔터 2. State or Province Name (full name) [Snake Desert]:엔터 3. Locality Name (eg, city) [Snake Town]:엔터 4. Organization Name (eg, company) [Snake Oil, Ltd]:엔터 5. Organizational Unit Name (eg, section) [Webserver Team]:엔터 6. Common Name (eg, FQDN) [www.snakeoil.dom]:엔터 7. Email Address (eg, name@FQDN) [www@snakeoil.dom]:엔터 8. Certificate Validity (days) [365]:엔터 ______________________________________________________________________
STEP 3: Generating X.509 certificate signed by Snake Oil CA [server.crt] Certificate Version (1 or 3) [3]:엔터 Signature ok subject=/C=XY/ST=Snake Desert/L=Snake Town/O=Snake Oil, Ltd/OU=Webserver Team/CN=www.snakeoil.dom/Email=www@snakeoil.dom Getting CA Private Key Verify: matching certificate & key modulus read RSA key Verify: matching certificate signature ../conf/ssl.crt/server.crt: /C=XY/ST=Snake Desert/L=Snake Town/O=Snake Oil, Ltd/OU=Certificate Authority/CN=Snake Oil CA/Email=ca@snakeoil.dom error 10 at 1 depth lookup:Certificate has expired OK ______________________________________________________________________
STEP 4: Enrypting RSA private key with a pass phrase for security [server.key] The contents of the server.key file (the generated private key) has to be kept secret. So we strongly recommend you to encrypt the server.key file with a Triple-DES cipher and a Pass Phrase. Encrypt the private key now? [Y/n]: 엔터 read RSA key writing RSA key Enter PEM pass phrase:암호 Verifying password - Enter PEM pass phrase:암호다시 Fine, you're using an encrypted RSA private key. ______________________________________________________________________
RESULT: Server Certification Files
o conf/ssl.key/server.key The PEM-encoded RSA private key file which you configure with the 'SSLCertificateKeyFile' directive (automatically done when you install via APACI). KEEP THIS FILE PRIVATE!
o conf/ssl.crt/server.crt The PEM-encoded X.509 certificate file which you configure with the 'SSLCertificateFile' directive (automatically done when you install via APACI).
o conf/ssl.csr/server.csr The PEM-encoded X.509 certificate signing request file which you can send to an official Certificate Authority (CA) in order to request a real server certificate (signed by this CA instead of our demonstration-only Snake Oil CA) which later can replace the conf/ssl.crt/server.crt file.
WARNING: Do not use this for real-life/production systems
make[1]: 나감 `/home/jklee/down/apache_1.3.22/src' 디렉토리 [root@w3 apache_1.3.22]# [root@w3 apache_1.3.22]# make install
[root@w3 apache_1.3.22] cd /usr/local/httpd/conf [root@w3 conf]# vi httpd.conf 생략 ... 마지막 부분에 아래와 같은 부분이 있다. 아래부분에서 틀린 부분이 있으면 수정하자. ## ## SSL Virtual Host Context ##
<VirtualHost _default_:443>
# General setup for the virtual host DocumentRoot "/usr/local/httpd/htdocs" ServerName w3.leelab.or.kr ServerAdmin root@w3.leelab.or.kr ErrorLog /usr/local/httpd/logs/error_log TransferLog /usr/local/httpd/logs/access_log
# SSL Engine Switch: # Enable/Disable SSL for this virtual host. SSLEngine on
# SSL Cipher Suite: # List the ciphers that the client is permitted to negotiate. # See the mod_ssl documentation for a complete list. SSLCipherSuite ALL:!ADH:!EXPORT56:RC4+RSA:+HIGH:+MEDIUM:+LOW:+SSLv2:+EXP:+eNULL
# Server Certificate: 1180,2 88%
# Server Certificate: # Point SSLCertificateFile at a PEM encoded certificate. If # the certificate is encrypted, then you will be prompted for a # pass phrase. Note that a kill -HUP will prompt again. A test # certificate can be generated with `make certificate' under # built time. Keep in mind that if you've both a RSA and a DSA # certificate you can configure both in parallel (to also allow # the use of DSA ciphers, etc.) SSLCertificateFile /usr/local/httpd/conf/ssl.crt/server.crt #SSLCertificateFile /usr/local/httpd/conf/ssl.crt/server-dsa.crt
# Server Private Key: # If the key is not combined with the certificate, use this # directive to point at the key file. Keep in mind that if # you've both a RSA and a DSA private key you can configure # both in parallel (to also allow the use of DSA ciphers, etc.) SSLCertificateKeyFile /usr/local/httpd/conf/ssl.key/server.key #SSLCertificateKeyFile /usr/local/httpd/conf/ssl.key/server-dsa.key
# Server Certificate Chain: # Point SSLCertificateChainFile at a file containing the # concatenation of PEM encoded CA certificates which form the 1179,0-1 90% # Point SSLCertificateChainFile at a file containing the # concatenation of PEM encoded CA certificates which form the # certificate chain for the server certificate. Alternatively # the referenced file can be the same as SSLCertificateFile # when the CA certificates are directly appended to the server # certificate for convinience. #SSLCertificateChainFile /usr/local/httpd/conf/ssl.crt/ca.crt
# Certificate Authority (CA): # Set the CA certificate verification path where to find CA # certificates for client authentication or alternatively one # huge file containing all of them (file must be PEM encoded) # Note: Inside SSLCACertificatePath you need hash symlinks # to point to the certificate files. Use the provided # Makefile to update the hash symlinks after changes. #SSLCACertificatePath /usr/local/httpd/conf/ssl.crt #SSLCACertificateFile /usr/local/httpd/conf/ssl.crt/ca-bundle.crt
# Certificate Revocation Lists (CRL): # Set the CA revocation path where to find CA CRLs for client # authentication or alternatively one huge file containing all # of them (file must be PEM encoded) # Note: Inside SSLCARevocationPath you need hash symlinks 1200,1 91% # of them (file must be PEM encoded) # Note: Inside SSLCARevocationPath you need hash symlinks # to point to the certificate files. Use the provided # Makefile to update the hash symlinks after changes. #SSLCARevocationPath /usr/local/httpd/conf/ssl.crl #SSLCARevocationFile /usr/local/httpd/conf/ssl.crl/ca-bundle.crl
# Client Authentication (Type): # Client certificate verification type and depth. Types are # none, optional, require and optional_no_ca. Depth is a # number which specifies how deeply to verify the certificate # issuer chain before deciding the certificate is not valid. #SSLVerifyClient require #SSLVerifyDepth 10
# Access Control: # With SSLRequire you can do per-directory access control based # on arbitrary complex boolean expressions containing server # variable checks and other lookup directives. The syntax is a # mixture between C and Perl. See the mod_ssl documentation # for more details. #<Location /> #SSLRequire ( %{SSL_CIPHER} !~ m/^(EXP|NULL)/ \ 1221,1 93% #<Location /> #SSLRequire ( %{SSL_CIPHER} !~ m/^(EXP|NULL)/ \ # and %{SSL_CLIENT_S_DN_O} eq "Snake Oil, Ltd." \ # and %{SSL_CLIENT_S_DN_OU} in {"Staff", "CA", "Dev"} \ # and %{TIME_WDAY} >= 1 and %{TIME_WDAY} <= 5 \ # and %{TIME_HOUR} >= 8 and %{TIME_HOUR} <= 20 ) \ # or %{REMOTE_ADDR} =~ m/^192\.76\.162\.[0-9]+$/ #</Location>
# SSL Engine Options: # Set various options for the SSL engine. # o FakeBasicAuth: # Translate the client X.509 into a Basic Authorisation. This means that # the standard Auth/DBMAuth methods can be used for access control. The # user name is the `one line' version of the client's X.509 certificate. # Note that no password is obtained from the user. Every entry in the user # file needs this password: `xxj31ZMTZzkVA'. # o ExportCertData: # This exports two additional environment variables: SSL_CLIENT_CERT and # SSL_SERVER_CERT. These contain the PEM-encoded certificates of the # server (always existing) and the client (only existing when client # authentication is used). This can be used to import the certificates # into CGI scripts. 1242,1 95% # authentication is used). This can be used to import the certificates # into CGI scripts. # o StdEnvVars: # This exports the standard SSL/TLS related `SSL_*' environment variables. # Per default this exportation is switched off for performance reasons, # because the extraction step is an expensive operation and is usually # useless for serving static content. So one usually enables the # exportation for CGI and SSI requests only. # o CompatEnvVars: # This exports obsolete environment variables for backward compatibility # to Apache-SSL 1.x, mod_ssl 2.0.x, Sioux 1.0 and Stronghold 2.x. Use this # to provide compatibility to existing CGI scripts. # o StrictRequire: # This denies access when "SSLRequireSSL" or "SSLRequire" applied even # under a "Satisfy any" situation, i.e. when it applies access is denied # and no other module can change it. # o OptRenegotiate: # This enables optimized SSL connection renegotiation handling when SSL # directives are used in per-directory context. #SSLOptions +FakeBasicAuth +ExportCertData +CompatEnvVars +StrictRequire <Files ~ "\.(cgi|shtml|phtml|php3?)$"> SSLOptions +StdEnvVars </Files> 1263,1 96% SSLOptions +StdEnvVars </Files> <Directory "/usr/local/httpd/cgi-bin"> SSLOptions +StdEnvVars </Directory>
# SSL Protocol Adjustments: # The safe and default but still SSL/TLS standard compliant shutdown # approach is that mod_ssl sends the close notify alert but doesn't wait for # the close notify alert from client. When you need a different shutdown # approach you can use one of the following variables: # o ssl-unclean-shutdown: # This forces an unclean shutdown when the connection is closed, i.e. no # SSL close notify alert is send or allowed to received. This violates # the SSL/TLS standard but is needed for some brain-dead browsers. Use # this when you receive I/O errors because of the standard approach where # mod_ssl sends the close notify alert. # o ssl-accurate-shutdown: # This forces an accurate shutdown when the connection is closed, i.e. a # SSL close notify alert is send and mod_ssl waits for the close notify # alert of the client. This is 100% SSL/TLS standard compliant, but in # practice often causes hanging connections with brain-dead browsers. Use # this only for browsers where you know that their SSL implementation 1284,5 98% # practice often causes hanging connections with brain-dead browsers. Use # this only for browsers where you know that their SSL implementation # works correctly. # Notice: Most problems of broken clients are also related to the HTTP # keep-alive facility, so you usually additionally want to disable # keep-alive for those clients, too. Use variable "nokeepalive" for this. # Similarly, one has to force some clients to use HTTP/1.0 to workaround # their broken HTTP/1.1 implementation. Use variables "downgrade-1.0" and # "force-response-1.0" for this. SetEnvIf User-Agent ".*MSIE.*" \ nokeepalive ssl-unclean-shutdown \ downgrade-1.0 force-response-1.0
# Per-Server Logging: # The home of a custom SSL log file. Use this when you want a # compact non-error SSL logfile on a virtual host basis. CustomLog /usr/local/httpd/logs/ssl_request_log \ "%t %h %{SSL_PROTOCOL}x %{SSL_CIPHER}x \"%r\" %b"
</VirtualHost>
</IfDefine>
[root@w3 apache_1.3.22]# /usr/local/httpd/bin/apachectl startssl Apache/1.3.22 mod_ssl/2.8.5 (Pass Phrase Dialog) Some of your private key files are encrypted for security reasons. In order to read them you have to provide us with the pass phrases.
Server w3:443 (RSA) Enter pass phrase:앞에서 입력한 암호 입력
Ok: Pass Phrase Dialog successful. /usr/local/httpd/bin/apachectl startssl: httpd started [root@w3 apache_1.3.22]#
홈페이지를 확인하자... https://w3.leelab.co.kr 또는 https://localhost
2. MySQL 설치하기 가. 기존 MySQL 삭제하기 [root@w3 conf]# rpm -qa|grep mysql mysql-3.23.22-6kr mysql-devel-3.23.22-6kr php-mysql-4.0.3pl1-1 mysql-server-3.23.22-6kr [root@w3 conf]# rpm -e mysql-devel [root@w3 conf]# rpm -e mysql-server [root@w3 conf]# rpm -e php-mysql [root@w3 conf]# rpm -e mysql
나. MySQL 설치하기 [root@w3 down]# cd mysql-3.23.47 [root@w3 mysql-3.23.47]# ./configure --prefix=/usr/local/mysql --with-charset=euc_kr [root@w3 mysql-3.23.47]# make [root@w3 mysql-3.23.47]# make install [root@w3 mysql-3.23.47]# /usr/local/mysql/bin/mysql_install_db
다. MySQL 데몬 실행하기 [root@w3 mysql-3.23.47]# cp support-files/my-medium.cnf /etc/my.cnf [root@w3 mysql-3.23.47]# cd /usr/local/ [root@w3 local]# groupadd mysql [root@w3 local]# useradd -g mysql mysql [root@w3 local]# chown -R root /usr/local/mysql [root@w3 local]# chown -R mysql.mysql /usr/local/mysql/var [root@w3 local]# /usr/local/mysql/bin/safe_mysqld &
라. MySQL 데몬 종료하기 [root@w3 local]# /usr/local/mysql/bin/mysqladmin -u root shutdown
3. PHP 설치하기 가. 기존 PHP 삭제하기 [root@w3 php-4.1.1]# rpm -qa|grep php
[root@w3 php-4.1.1]# rpm -e php-imap [root@w3 php-4.1.1]# rpm -e php-ldap [root@w3 php-4.1.1]# rpm -e php
나. PHP 설치하기 [root@w3 php-4.1.1]# ./configure --with-apxs=/usr/local/httpd/bin/apxs --with-config-file-path=/usr/local/httpd --with-mysql=/usr/local/mysql --enable-track-vars --disable-debug [root@w3 php-4.1.1]# make [root@w3 php-4.1.1]# make install
다. PHP 환경설정 [root@w3 php-4.1.1]# cd /usr/local/httpd/conf [root@w3 conf]# vi httpd.conf 생략 AddType application/x-httpd-php .php .php3 .phtml .html .htm AddType application/x-httpd-php-source .phps 생략
4. 테스트하기 [root@w3 conf]# /usr/local/httpd/bin/apachectl stop [root@w3 conf]# /usr/local/httpd/bin/apachectl startssl
오류가 나오면 아래와 같이 수정한 후에 다시 해보세요..
[root@user httpd]# cd /etc [root@www /etc]# vi ld.so.conf 생략 .. /usr/local/mysql/lib/mysql
[root@www /etc]# ldconfig
[root@w3 /etc]# /usr/local/httpd/bin/apachectl stop [root@w3 /etc]# /usr/local/httpd/bin/apachectl startssl
[root@w3 /etc]# cd /usr/local/httpd/htdocs [root@w3 htdocs]# vi phpinfo.php <? phpinfo(); ?> 웹 브라우저에서 https://localhost 또는 https://도메인이름 하시면 됩니다.
5. 공인 인증서 신청하기 여기서 인증된 기관에 직접 요청을 해 인증서를 받는 부분에 대해 언급하고자 한다. 베리사인에서는 2주 동안 사용해 볼 수 있는 테스트용 인증서를 발급해 주고 있으며, FreeSSL이라는 곳에서는 인증서를 처음에 무료로 발급해 주고 있다. 재발급시에는 물론 약간의 비용을 지불하게 되고, 브라우저가 인식할 수 있는 것도 70%이상이므로 테스트하는 역할로 충분하다. 1년동안 무료로 사용할 수 있으며, 128비트를 지원하고 있다. 인터넷 익스플로러 5.01 이상이면 사용하는데 문제가 없을 것이다. 자세한 것은 홈페이지(www.freessl.com)을 참고하기 바라며, 인증서를 신청하는 폼은 아래 사이트에서 신청하면 된다. https://tc.geotrust.com/truesite/freeSSL_Enroll.jsp
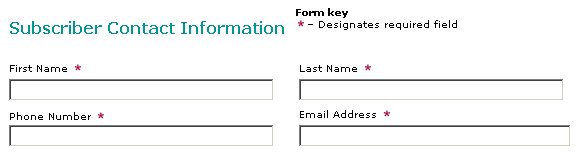
위의 개인 정보를 입력한다.
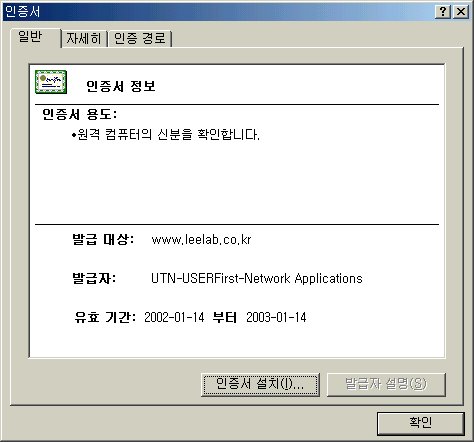
[root@w3 conf]# ls access.conf magic server.csr ssl.crt access.conf.default magic.default server.key ssl.csr httpd.conf mime.types srm.conf ssl.key httpd.conf.bak mime.types.default srm.conf.default ssl.prm httpd.conf.default rand.dat ssl.crl [root@w3 conf]# cd ssl.csr [root@w3 ssl.csr]# ls README.CSR server.csr [root@w3 ssl.csr]# less server.csr "/usr/local/httpd/conf/ssl.csr/server.csr"의 내용을 보면, '-----BEGIN CERTIFCATE REQUEST-----' 시작하고 '-----END CERTIFCATE REQUEST-----' 끝나는 내용이 있다. 이부분을 복사하여 붙여 넣는다. 그리고, submit버튼을 클릭한다. 그 다음 신청한 인증서에 대한 증명을 해줄 수 있는 이메일 주소를 요청할 것이다. FreeSSL은 여러 이메일을 주소를 나열해 줄 것이고 여러분들은 하나를 선택한 후, 이메일 도착 시 그곳에 지정된 내용에 따라 '확인' 작업을 해주면 FreeSSL에 의해 서명된 인증서가 여러분의 이메일로 도착한다. 베리사인과 같은 인증기관에서는 인증서를 발급해 주기 위해 그 회사의 사업자 등록증과 같은 여러정보를 요청한 후 절차를 거친후에 인증서를 발급해 주게 된다. 메일이 도착하면, 아래의 사이트를 클릭한다. --------- 메일 내용 ----------FreeSSL Certificate Request Confirmation GeoTrust provides FreeSSL Web server certificates to qualified domain sites. As part of the order process, we require the registered domain owner to approve the certificate information. jinkwan lee has requested an SSL certificate for a host in your domain: www.leelab.co.kr. He/she has provided jklee@leelab.co.kr as their email address and "82-63-466-7125" for their phone number. You, as the registered domain owner, can elect to approve, or reject this request. If you have any doubts about this request, please contact the individual. To approve or reject this Web server certificate request, please go to the GeoTrust FreeSSL approval site. For more information about FreeSSL, please visit our Web site at www.FreeSSL.com. ---------------------------- 웹페이지 나타나면, 내용중에 'I Approve'를 선택 후 인증서가 도착하기를 기다리면 된다. 다시 답장 메일이 도착하면, 메일 내용중에 "-----BEGIN CERTIFCATE-----"로 시작해 "-----END CERTIFCATE-----"로 끝나는 부분이 있을 것이다. 이 부분을 복사하여 server.crt 또는 domainname.crt와 같은 파일로 저장한다. 이 파일을 /usr/local/httpd/conf/ssl.crt/디렉토리에 저장한다. 그리고, 아파치를 다시 시작한다. [root@w3 /conf]# /usr/local/httpd/bin/apachectl stop [root@w3 /conf]# /usr/local/httpd/bin/apachectl startssl 웹사이트에 접속하여 인증서를 확인하면, 다음과 같이 공인된 인증서가 보일 것이다.
|